
Guide
This document is a high-level guide that describes how to use SnabbWall to set up a basic firewall. See the design page for background on the basic philosophy and design of SnabbWall.
Use-case
This guide will use a concrete use-case to illustrate how one might set up a SnabbWall deployment. Imagine that you are running a public network, maybe a cafe hotspot or a corporate guest network, and wish to block Bittorrent traffic to save on bandwidth.
To simplify the setup, we will start with a program that simulates this network activity by reading and writing packet capture files (in pcap format). Near the end, the document explains what aspects need to change in order to run the firewall with real network interfaces.
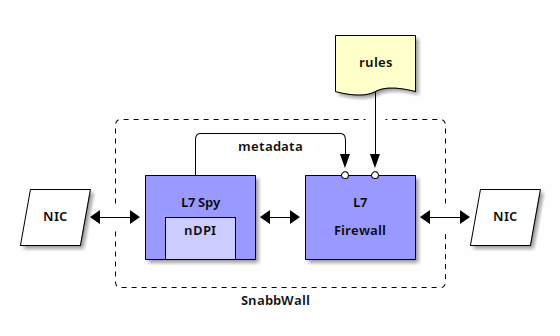
The diagram below from the design page shows a typical SnabbWall configuration.
Building blocks
The Snabbwall suite comes with two main apps:
L7Spy (a packet scanner)
and L7Fw (a firewall). As you can
see above, the scanner app consumes and scans packets coming into the program
(e.g., from a NIC, a pcap reader, or any other app).
In a simple setup, the scanner forwards packets to the firewall app. The firewall consults the data from the scanner and can make forwarding decisions, based on a set of firewall rules.
The firewall app drops packets as necessary according to the firewall rules and forwards the rest to the next app. For example, in the diagram above the firewall sends packets out to another NIC.
Installation
Before getting into the configuration details, let’s quickly go over how to obtain a copy of Snabbwall. (Feel free to move on to the next section if you’ve already installed it)
For this guide, you will want to obtain a source code distribution from the
Github releases page. To build Snabbwall, just
unpack the source code archive and run make in the unpacked directory.
You will also need to obtain and build a copy of the nDPI library either through your operating system’s package manager or via Github. Snabbwall will work with nDPI v1.8 (the newest version as of March 2017). The instructions for building nDPI are in the linked Github README.
Note: depending on where you install nDPI, you may need to set LD_LIBRARY_PATH when running
a Snabbwall program to ensure that it can load libndpi.so via the LuaJIT FFI.
First steps
To create a runnable firewall, we need to make a Snabb program (a program is a set of Snabb apps that are configured to solve a task). If you’re not familiar with Snabb programs, you may benefit from also reading Snabb’s Getting Started document.
Here is a barebones firewall program module. To make this runnable,
name the file example_firewall.lua and put it in the src/program/example_firewall
directory of your Snabbwall distribution.
-- example_firewall.lua

module(..., package.seeall)

-- basic module imports
local raw  = require("apps.socket.raw")
local pcap = require("apps.pcap.pcap")
local spy  = require("apps.wall.l7spy")
local fw   = require("apps.wall.l7fw")
local ndpi = require("apps.wall.scanner.ndpi")

-- configuration parameters for the l7fw
-- replace these with the appropriate values for your firewall host
-- for testing purposes, any values are ok
local host_ip  = "192.168.0.1"
local host_mac = "01:23:45:67:89:ab"

function run (args)
   -- an nDPI scanner instance for l7spy and l7fw
   local s = ndpi:new()

   -- configuration of the Snabb app network
   local c = config.new()

   -- a very basic rules table
   local rules = { default = "accept" }

   -- configuration table for l7fw
   local fw_config = { scanner = s,
                       rules = rules,
                       local_ipv4 = host_ip,
                       local_mac = host_mac }

   config.app(c, "net1", pcap.PcapReader, args[1])
   config.app(c, "net2", pcap.PcapWriter, args[2])

   config.app(c, "scanner", spy.L7Spy, { scanner = s })
   config.app(c, "firewall", fw.L7Fw, fw_config)

   config.link(c, "net1.output -> scanner.south")
   config.link(c, "scanner.north -> firewall.input")
   config.link(c, "firewall.output -> net2.input")
   config.link(c, "firewall.reject -> net2.input")

   engine.configure(c)

   -- run for 5 seconds and show the app reports
   engine.main({duration=5, report = { showapps=true }})
end
Let’s walk through this step-by-step. At the top, we have several module imports
and some constant definitions like the IP of the router host called host_ip.
The main part of the program is the run function, which is called by the Snabb
framework when the program is invoked.
The run function first sets up several definitions. The s variable is the
packet scanner that our instances of L7Spy and L7Fw will use. The c variable
is the configuration of the Snabb program.
The rules definition is the table of firewall rules. For now, it’s defined to
accept all packets. We’ll update this later.
The fw_config table stores the configuration for the L7Fw app, which takes
several configuration arguments. It’s recommended to fill out the local_ipv4
(and/or local_ipv6) and local_mac fields, which are used to send out responses
in case of a reject policy.
The rules and scanner keys are also mandatory.
The config.app and config.link lines are setting up the app network for this
Snabb program. This is also pretty straightforward. The first four lines instantiate
the four apps in our app network with their configurations.
The six link lines set up the connections between the apps. The net1 app pulls
in packets from the “network interface” (though it’s just a file for now), and
pushes them into the scanner app’s south end.
The scanner pushes packets from its south end to its north end and vice versa.
The north end in this case is connected to the firewall, so packets get pushed to
the firewall after exiting the scanner.
After going through the firewall, the packets are pushed to the net2 network
interface. There are two output links for the firewall, in case you need to
distinguish forwarded packets from the firewall (on output)
and error responses that are constructed by the firewall (on reject).
Running the firewall
To run the firewall, first recompile Snabb (make in the top-level directory)
and then invoke it as:
sudo ./snabb example_firewall <input_file>.pcap <output_file>.pcap
supplying appropriate pcap file paths. There are many test pcap files available
in src/program/wall/tests/data.
Note: you need to have libndpi installed to use the packet scanner.
See the installation instructions from earlier for obtaining nDPI. Without it,
you may see an error like the following:
ndpi/c.lua:73: libndpi.so: cannot open shared object file: No such file or directory
After running the example program, you should see a report that looks similar to this:
apps report:
l7fw
Accepted packets: 17 (100%)
Rejected packets: 0 (0%)
Dropped packets:  0 (0%)
The actual number of accepted packets will depend on the pcap file that you use.
Using non-trivial firewall rules
The firewall rules that we are using now are not very interesting. Let’s go back to our Bittorrent scenario and consider what is needed to support that.
The firewall rules are specified using a Lua table whose keys are protocol names
(or "default") and whose values are strings which describe particular policies for
that protocol.
For example, to specify that Bittorrent traffic should be blocked entirely, change
the local rules = ... line above to the following:
local rules = { BITTORRENT = "drop",
                default = "accept" }
Now we can run the example program on some example Bittorrent traffic to test the rules:
sudo ./snabb example_firewall\
  program/wall/tests/data/BITTORRENT.pcap output.pcap
You should see a report with the following numbers:
apps report:
l7fw
Accepted packets: 0 (0%)
Rejected packets: 0 (0%)
Dropped packets:  53 (100%)
The firewall rules can also be more sophisticated. The right-hand sides of the key-value pairs can be a string that describes a pfmatch program.
For example, here is a rule that only drops Bittorrent flows if there are at least 5
packets in the flow and the destination IP address is 10.10.10.22:
local rules = { BITTORRENT = [[match { flow_count >= 5 and
                                         dst net 10.10.10.22
                                       => drop;
                                       otherwise => accept }]],
                default = "accept" }
With this change, you should see 36 accepted packets and 17 dropped packets with the pcap file from earlier.
Making the firewall more realistic
So far, our firewall only works with capture files and not real traffic coming in from a NIC. If you have a test machine with two NICs, you can replace the packet reader and writers with apps that connect to the NICs (assuming you have some Intel 10G NICs or another NIC supported by Snabb).
First, you will need an additional module import at the top:
local driver = require("apps.intel.intel_app").driver
This imports intel_driver app which is used to receive and send
packets for an Intel 10G NIC. The idea is to replace the net1
and net2 app instances from before with the Intel app.
Note: if you don’t have a supported NIC, you can also test this with the RawSocket app which uses a kernel-managed network interface. Just replace the above line with:
local driver = require("apps.socket.raw").RawSocket
The new app config declarations should look like this:
-- replace the pciaddr field with the appropriate result
-- use 'lspci' to see what your PCI addresses are
config.app(c, "net1", driver, { pciaddr = "81:00.0" })
config.app(c, "net2", driver, { pciaddr = "82:00.0" })
(For RawSocket, the third argument should be a string for the network
interface, e.g., "eth0")
The Intel driver takes a PCI address as a mandatory argument to specify the appropriate NIC. There are also other arguments that you can supply which are detailed in the API docs.
The link declarations also need to change, because the Intel app uses
different names (tx and rx) from the pcap apps. The new links
look like this:
config.link(c, "net1.tx -> scanner.south")
config.link(c, "scanner.north -> firewall.input")
config.link(c, "firewall.output -> net2.rx")
config.link(c, "firewall.reject -> net2.rx")
With that change, you should be able to filter packets from the first NIC to the second using the firewall app. You can run the program like this:
sudo ./snabb example_firewall
without any arguments since we are no longer passing in file paths.
Filtering packets in the other direction
You may have noticed that the current firewall configuration only filters packets going in one direction: from the first NIC to the second. There’s a good chance, however, that you will also wish to scan and filter outbound packets going out of the network.
To set that up, you will need two instances of the L7Fw app, one for each
direction of traffic. On the other hand, you will only need one L7Spy since
it is set up for bidirectional packet flows.
The setup looks like this:
-- with the
config.app(c, "net1", driver, { pciaddr = "81:00.0" })
config.app(c, "net2", driver, { pciaddr = "82:00.0" })

-- Set up two firewalls this time
config.app(c, "scanner", spy.L7Spy, { scanner = s })
config.app(c, "firewall1", fw.L7Fw, fw_config)
config.app(c, "firewall2", fw.L7Fw, fw_config)

-- Incoming packets
config.link(c, "net1.tx -> scanner.south")
config.link(c, "scanner.north -> firewall1.input")
config.link(c, "firewall1.output -> net2.rx")
config.link(c, "firewall1.reject -> net2.rx")

-- Outgoing packets
config.link(c, "net2.tx -> scanner.north")
config.link(c, "scanner.south -> firewall2.input")
config.link(c, "firewall2.output -> net1.rx")
config.link(c, "firewall2.reject -> net1.rx")
Note that the two firewall app instances use the same set of rules. You may wish to configure them so that the rules are different based on the direction of traffic, in which case you can just specify different rule tables for each instance.
Wrapping up
With those last changes, the example program is getting close to what a realistic deployment of Snabbwall might look like. There are a few aspects that would need adjustment for a real deployment.
For example, you may wish to adjust the invocation of engine.main
to remove the duration argument so that the firewall runs indefinitely.
To aid in debugging, it may be desirable to log actions to the system
log. To enable logging for the L7Fw app set the logging key in
fw_config to "on". This will log dropped packets to the system log.
If you would like to hack on the Snabbwall apps themselves, the source code is available in the src/apps/wall directory. Please feel free to file any bug reports or pull requests via the Github page.